Saving Cisco Configuration to TFTP Server
this page will show you how to backup your cisco configuarion to files - the purpose of this step by step tutorial guide is to show you how you can backup your cisco switch 2950 or your pix 515e firewalls running configuration to a tftp server in windows [3533], Last Updated: Mon Jun 24, 2024
Webune Support
Tue Apr 20, 2010
1 Comments
1229 Visits
Welcome to Webune Support.
The purpose of this step by step tutorial guide is to show you how you can backup your cisco switch 2950 or your PIX 515e Firewalls running configuration to a TFTP server in windows
my this demo, we will be using a windows 2000 Professional Computer and a Cisco 2950 CMS (Cisco Cluster Management Suite) so follow these instructions.
saving your current configuration of your cisco appliances is extremely important in the event your current configuration becomes corrupted. if you have ever need to back up and restore or create configuration files for cisco systems, we will show you how easy it is. this applies to any network appliance, we are using a cisco 2950, but this concept will also work for cisco ASA firewalls, switches like 3550 and you wont even need a script for automatic backups wihtout a backup utility. so lets start backing up our files.
Back up and Restore Configuration Files - Cisco Systems
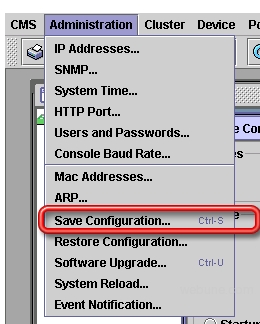
1. login to your cisco switch CMS panel:
go to Administration > Save Configuration (Ctrl-S)
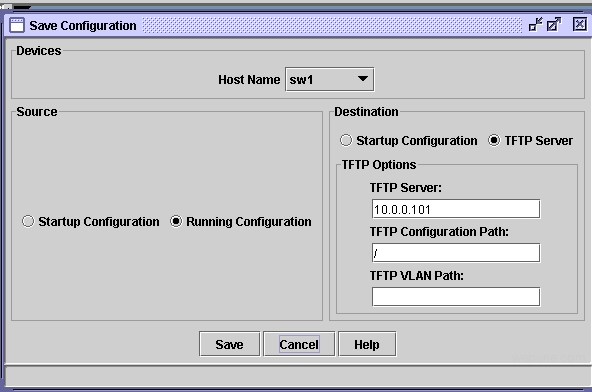
2. populate the following fields:
* Source
= Running Configuration
* Destination
= TFTP Server
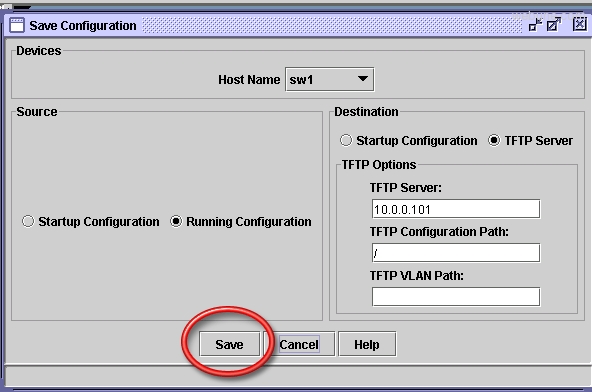
= TFTP Server IP Address = 10.0.0.101 (or whatever your windows computer ip address, for this tutorial we are using 10.0.0.101 which is the ip address i assigned to my windows 2000 computer)
= TFTP Configuration Path
/
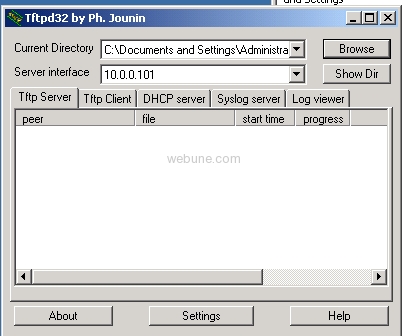
3. on step three, go back to your windows computer and download the TFTPD deamon at:
http://tftpd32.jounin.net/tftpd32_download.html
4. once you have download the tftpd, unzip and run the tftpd32.exe file
5. go to your C:\ directory and create a new folder called Webune
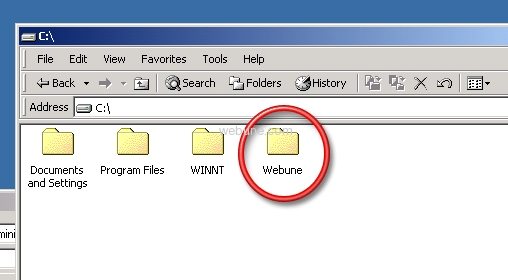
6. once you have created a new folder called Webune, go back to the Tftpd32 application and click on the 'Browse" button to specified the new directory we just created under 'Current Directory'
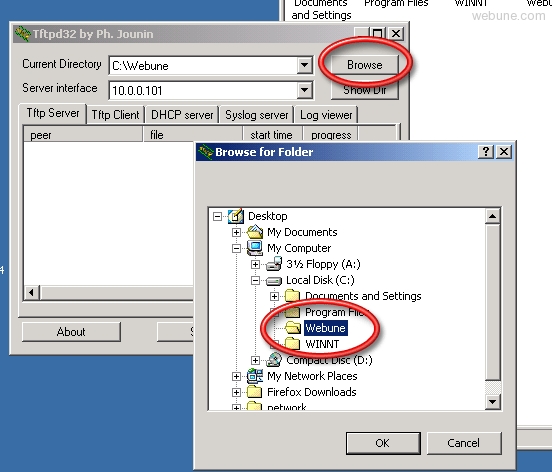
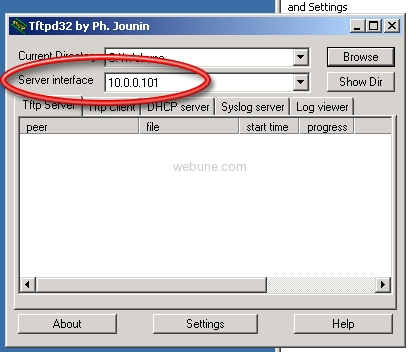
7. now in the 'Server interface' field, enter the ip address we set on step 2 in the Cisco CMS, in our case, we are using 10.0.0.101
8. go back to the Cisco CMS Panel and click on 'Save'
9. you will start to notice the connection the switch is making to your TFTP server by observing the activity in the Tftpd32 window:
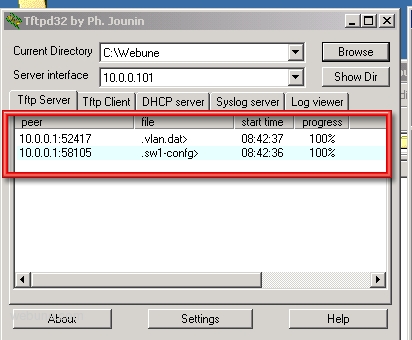
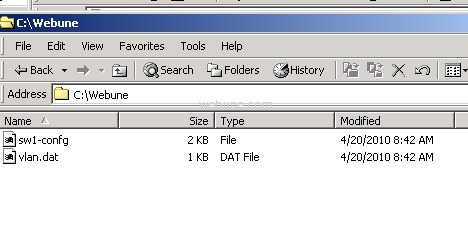
10. Congratulations, you have now saved you Cisco Swtich configs to your computer. you can confirm by going to the C:\Webune directory
you will see two files:
sw1-confg
vlan.dat
Please provide any comments
The purpose of this step by step tutorial guide is to show you how you can backup your cisco switch 2950 or your PIX 515e Firewalls running configuration to a TFTP server in windows
my this demo, we will be using a windows 2000 Professional Computer and a Cisco 2950 CMS (Cisco Cluster Management Suite) so follow these instructions.
saving your current configuration of your cisco appliances is extremely important in the event your current configuration becomes corrupted. if you have ever need to back up and restore or create configuration files for cisco systems, we will show you how easy it is. this applies to any network appliance, we are using a cisco 2950, but this concept will also work for cisco ASA firewalls, switches like 3550 and you wont even need a script for automatic backups wihtout a backup utility. so lets start backing up our files.
Back up and Restore Configuration Files - Cisco Systems
1. login to your cisco switch CMS panel:
go to Administration > Save Configuration (Ctrl-S)

2. populate the following fields:
* Source
= Running Configuration
* Destination
= TFTP Server
= TFTP Server IP Address = 10.0.0.101 (or whatever your windows computer ip address, for this tutorial we are using 10.0.0.101 which is the ip address i assigned to my windows 2000 computer)
= TFTP Configuration Path
/

3. on step three, go back to your windows computer and download the TFTPD deamon at:
http://tftpd32.jounin.net/tftpd32_download.html
4. once you have download the tftpd, unzip and run the tftpd32.exe file

5. go to your C:\ directory and create a new folder called Webune

6. once you have created a new folder called Webune, go back to the Tftpd32 application and click on the 'Browse" button to specified the new directory we just created under 'Current Directory'

7. now in the 'Server interface' field, enter the ip address we set on step 2 in the Cisco CMS, in our case, we are using 10.0.0.101

8. go back to the Cisco CMS Panel and click on 'Save'

9. you will start to notice the connection the switch is making to your TFTP server by observing the activity in the Tftpd32 window:

10. Congratulations, you have now saved you Cisco Swtich configs to your computer. you can confirm by going to the C:\Webune directory
you will see two files:
sw1-confg
vlan.dat

Please provide any comments
henri
Fri Jun 11, 2010
one problem i had was that it wasnt working for me. so to troubleshoot this i found out that my firewall was blocking the connection on my windows xp computer, so i had to enable port 69 which the tftp server uses.